

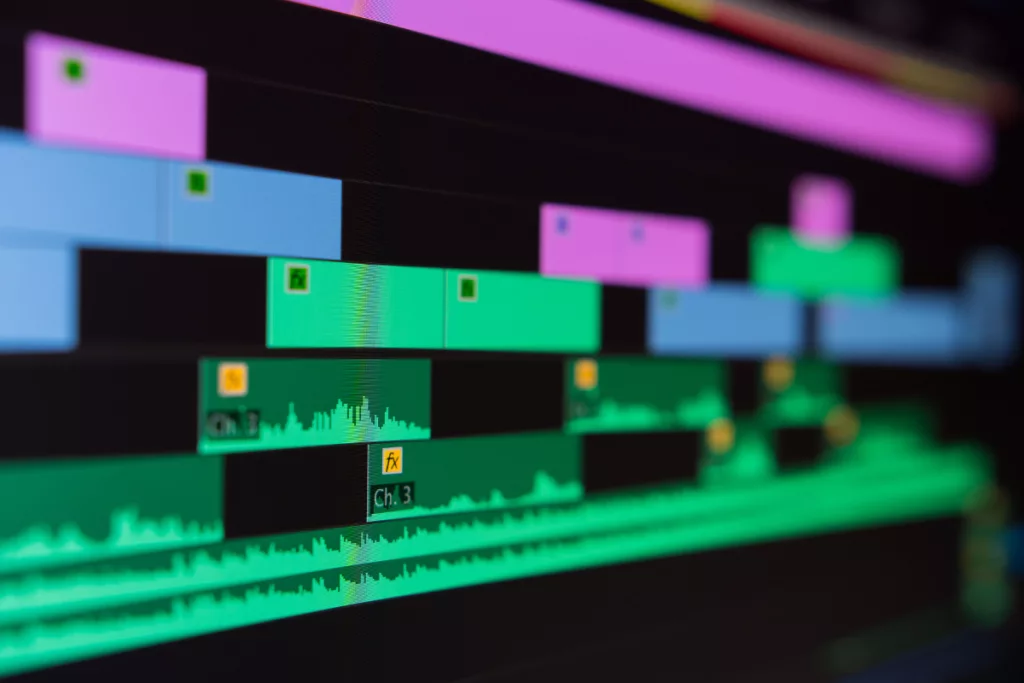
Video editing, a key element in filmmaking, has morphed into an art form, particularly with the refined use of video cuts. Cuts, like a classic jump cut or a well-placed match cut, are essential tools every video editor should know to create compelling visual stories in the digital era. Whether it’s a sudden shift that brings an electrifying jump cut or the subtle transition in a match cut, each type of film cut serves a distinct purpose.
A robust social media presence is crucial. For content creators, influencers, and small business owners, video is vital in differentiating yourself on platforms like YouTube, Instagram, and Facebook. The editing process, however, can consume substantial time and resources.
Advanced edits like J-cuts and L-cuts ensure seamless dialogues, while montages lend an air of drama to episodes. Every editor should know how to wield these essential cuts. That’s where Husky HD Video Cuts Editing Services come in. We’re here to streamline your workflow and help boost your social media presence effectively and efficiently.
Why Choose Husky HD Video Cuts Editing Services?
At Husky HD, we understand the power of storytelling and the impact of social media presence. Our talented video editors will transform your raw footage into polished videos that tell your story compellingly and engage your audience.
We specialize in editing services for YouTube and other social media content, ensuring that your videos have that extra sparkle to make them shine.
Reach out to us today for an exceptional service!
Mastering The Art Of Jump Cuts In Video Editing
Every video editor should know the notorious jump cut, a type of cut perfect for social media platforms like YouTube. It’s a hard cut, used to jump from one scene to the next, providing a seamless transition. The jump cut is a basic type of cut that every film editor should have in their toolbox, and it’s often used in filmmaking to create a visual story.
The jump cut can add life to even the dullest video, a tool that can be used to compress time or weave together different scenes for parallel editing. Take a look at successful YouTubers. Ever notice those sudden jumps from one shot to the next? That’s an effective usage of the jump cut, a prime example of how this essential editing technique helps mold a captivating narrative. By employing jump cuts, you, too, can transform your social media content and let your visual story take flight.
In short, the jump cut is not just any film cut. It’s a cut every editor should know, should use, and ultimately master. So go on, give it a try, and let your content stand out, one clip at a time.
Exploring Different Types of Cuts For Videos
Each type of film cut, also known as a ‘cut in film,’ uniquely serves the story and helps move it along. Video cuts are the bread and butter of an editor, creating a seamless transition from one scene to another.
In the myriad of cuts every editor should know, here are some essentials:
- Standard cut: Often referred to as the most used type of cut. It is a simple transition where one shot ends, and a new video begins.
- Jump cuts: These provide a sudden transition that gives an impression of a leap in time or action.
- Cross-cut or Parallel editing: It highlights two events simultaneously, adding dimension to your story.
Also, there are different cuts in film editing, including:
- J-cuts and L-cuts: Where the audio from the previous scene lingers, creating a seamless audio-visual flow.
- Smash cuts, Match cuts, and Cut transitions: Each serves a unique role in the editing process, adding drama to the next scene or next clip.
Editors can create a compelling visual story using these essential video and film cuts. While user-friendly video editing software like that at Husky HD makes the process easier, understanding the intricate method of cuts is vitally important. These techniques cut from one action to another, telling a story that grips viewers.
Stay tuned for more cutaway content!
How To Create Transitions For Instagram Reels
Instagram Reels has become a popular tool for creating fun, engaging, and sometimes downright magical content. Transitions can add creative flair to your Reels, keeping your viewers engaged and wanting more. Let’s examine the steps to creating seamless transitions for your Instagram Reels.
Before filming, plan your transition points and what happens before and after each transition. This will ensure a smooth process and a cohesive final product.
Steps To Creating Transitions
- Swipe to Reels: Open Instagram and swipe right to bring up the Stories camera. At the bottom, you’ll see a menu; swipe across and select ‘Reels’.
- Choose Music: Tap the ‘Music’ icon and choose your background track. The music can help determine when and where your transitions should occur.
- Set the Timer: The ‘Timer’ icon allows you to choose the length of your clip. Use this feature to record hands-free.
- Start Filming: Press and hold the central record button to film your first clip. Let go when you’re ready to stop recording.
- Add a Transition: This is where the magic happens! Say your first clip ended up close to an object. Start your second clip from the same place and pull away quickly to create the illusion of a seamless transition. Remember, it’s all about the continuity.
- Repeat: Keep filming and creating transitions until your Reel is complete. You can trim or delete any clip if needed.
- Final Touches: Once you’re done filming and happy with the transitions, you can add filters, captions, and stickers, then share your Reel with your audience.
Remember, practice makes perfect! The more you experiment, the better you’ll get at creating smooth transitions.
Happy Reeling!

Quick Steps To Boost Your Social Media Presence With Video Cuts Editing Services
- Identify Objectives: Set clear goals for your video content.
- Craft a Storyline: Create a compelling narrative for your video.
- Hire a Video Editor: Look for an experienced professional skilled in various film cuts, including jump cuts, match cuts, and L-cuts.
- Provide Vision: Convey your desired video tone, style, and pacing to the editor.
- Feedback Submission: Review the edited video, provide feedback, and make necessary adjustments.
- Social Media Optimization: Use relevant keywords, appealing thumbnails & titles for your video content.
- Content Promotion: Share your video across all social media channels for maximum visibility.
- User Engagement: Engage with viewers by responding to comments.
- Performance Review: Analyze video content performance to inform future strategy.
This process allows you to utilize video editing services to create engaging content and extend your social media presence.
The Role Of A Video Editor
A skilled video editor plays a crucial role in shaping narratives, directing focus, indicating the passage of time, and offering a seamless watching experience. They deftly weave together different types of cuts to evolve a basic type of cut into a mesmerizing montage, often using the technique of edit cuts.
Essential techniques in a video editor’s toolbox include the following:
- Jump cut: It brings dynamism to a scene by jumping from one frame to another.
- Match cut: Creating visual continuity from one scene to the next.
- Hard cut or Film cut: A straightforward transition from one clip to the next.
The L-cut and J-cut are valuable devices to maintain audio continuity across transitions, while parallel editing effectively juxtaposes two scenes. Cutaways are also useful to provide different perspectives or illustrate details.
When selecting a video editor, proficiency in video editing techniques, understanding of filmmaking continuity, and adeptness in manipulating transitions are crucial.
Remember, a great editor doesn’t just cut between two shots; they craft a journey from one scene to the next, making the resulting film more than just the sum of its parts.
The Art of Montage – Creating A Montage For YouTube
A montage is a compilation of video clips combined into one sequential video. Often accompanied by music, the montage can tell a story, evoke emotion, or serve as a highlight reel.
YouTube offers an excellent platform for long-form content and high-resolution videos, providing the perfect playground for montages. Whether you’re a travel vlogger, a gamer, or a storyteller, creating a montage for YouTube allows you to express your creativity and entertain your audience simultaneously.
Crafting A YouTube Montage In 5 Steps
- Determine the Theme: First, decide on what your montage will be about. Unlike shorter-form social media platforms, YouTube allows you to dive deep, providing room for comprehensive storytelling or detailed overviews.
- Select Your Clips: Once you have a theme, gather your best clips that fit this theme. Quality is essential on YouTube, so ensure your footage is clear, steady, and visually appealing.
- Sequence Your Clips: Arrange your clips to form a story, a progression, or a thematic unity. How you sequence your clips plays a big part in how viewers perceive your montage.
- Choose the Right Music: Music sets the mood for your montage. Choose a track that suits your theme and keeps viewers engaged. Be sure to follow YouTube’s copyright guidelines when selecting your music.
- Integrate Transitions: To make your montage flow smoothly, include visual transitions between clips. But remember, subtlety usually works best – you don’t want your changes to distract viewers from your content.

Pro Tips For A YouTube Montage
- Include an Intro and Outro: Intros and outros help to brand your content and make your montage look more professional. They can also help establish what your video is about and guide viewers to other content.
- Swap Cuts with Beat Drops: Sync your cuts with the beat of the music. This can make your montage more satisfying and help retain the viewer’s attention.
- Add Text Overlays: If necessary, utilize text overlays to provide additional context or to emphasize key points in your montage.
- End With a Call-to-Action (CTA): Encourage viewers to like, share, comment, or subscribe at the end of your video. This can increase engagement and boost your channel’s growth.
Creating a captivating montage for YouTube takes time and practice, but the rewards are well worth the effort. With Husky HD behind the lens, your video content will shine like never before, ready to captivate audiences and skyrocket your social media presence.
So start today, be creative, and enjoy the process!

0 Comments